Introduction
In this article, I would be showing you how to set up continuous integration for Android projects. Now, for those of you who really don’t know much about continuous integration or don’t know what the benefits are, in simple terms, it is a software development practise where multiple integrations for changes are done frequently, including automated builds and testing for each changes integrated. This makes it easy to detect errors in the code early on with a realtime feedback loop.
I decided to use CircleCi for this mainly because it is cloud-based, does not require a dedicated server and the hassle that comes with that. There are other options available out there though, like Jenkins, TravisCi, TeamCity, CodeShip and many others. Check out this article by Stackify which lists and breaks down their features.
First Steps
To start using CircleCi in your project, you must have it checked in to a git repository. CircleCi supports both Github and bitbucket.
Go to CircleCi and log in with either your github or bitbucket account and give circleci the appropriate authorization.
The next page shows you a list of projects in your profile with a “Setup project” button next to each one. When you click on “setup project” for the project you’re trying to configure, it displays an initial setup screen. You are required to add a configuration file to start building your project using circleci.
Configuration file
CircleCi uses a YAML file to identify how you want your testing environmnet setup and how you want your builds, tests and deployment to be executed. You would have to add a .circleci directory in the root of your project and a config.yml file inside it, as par CircleCi 2.0, so the path looks like this .circleci/config.yml
Add this to your config.yml
| |
The first line here obviously states that we want our builds to run on version 2 of circleci (note that this article is about setting up circleci 2.0 which is recommended as version 1 is deprecated).
| |
Next is a jobs key, a job is usually a collection of steps and each one represents a phase in your build-test-deploy process. For this example we only need a build job, so everything else is going to be under that key.
For each job we can specify a working directory where our code will be checked out to and this would be used as the default working directory unless otherwise specified.
| |
Next we add a docker image under the working directory to setup our initial environment. There is a list of publicly available container images that can be used ranging from android to other languages and platforms like javascript, node, python, etc. You can check out https://circleci.com/docs/2.0/circleci-images/ for information on other available images.
Now we add a list of steps in the build job, first a checkout step — to pull down our code so we can work on it.
Environment Variables
If your project requires certain environment variables, there is an option to add these variables to our circleci build settings by clicking on the project setting on the dashboard and navigating to Environment Variables which can be located under Build Settings. Make use of the “Add Variable” button at the right side of the page.

For this project, I had a local.properties file on my local machine which wasn’t checked into git. Now for the build to run successfully I had to duplicate this on the circleci remote repository. This can be achieved by adding a run step with some basic bash command to the build job.
| |
This creates a local.properties file in the root of the project with the content: fabricApiKey=$FABRIC_API_KEY (This is automatically replaced by the value of the corresponding Environment variable)
After that, we have a restore_cache key, which basically restores the cache of the project dependencies.
| |
Next, we run ./gradlew androidDependencies to download the project dependencies
| |
After that, we have a save_cache key, this saves a cache of the project dependencies, this will be applied when next our build runs and our gradle files has not been changed in the restore_cache step
Then we are free to run our tests! ./gradlew lint test
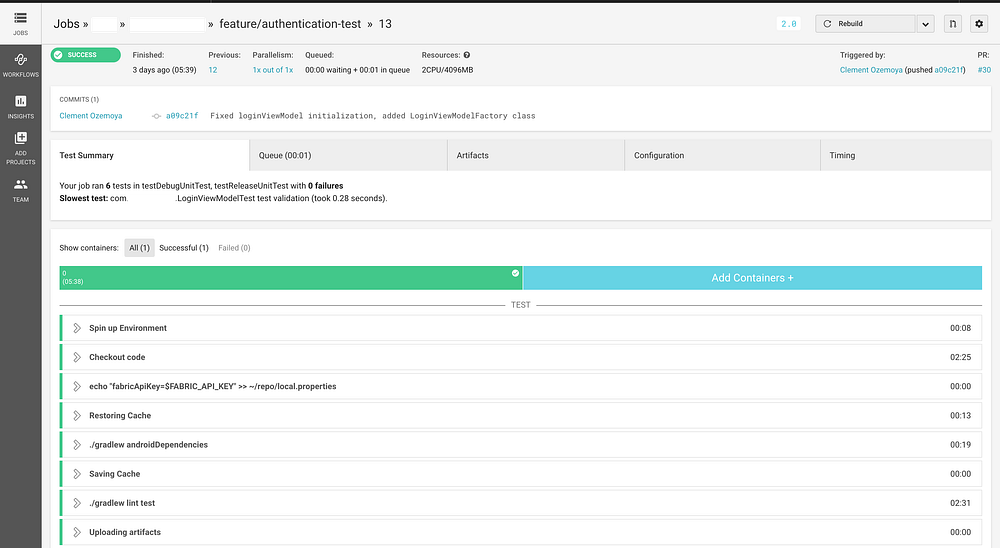
store_artifacts and store_test_results saves the results of the tests ran, this will be accessible on the build screen on your circleci dashboard.
| |
After setting up your config file and pushing it to your repository, you can now click on Start building on your project setup screen to see circleci run the build and test.

Immediately Start building is clicked, CircleCi runs the first build and automatically runs subsequent builds everytime a change is detected in the repo i.e when you push new changes to your repo.

Benefits of Continuous Integration
Setting up CI for your Android project provides several key benefits:
- Early Error Detection: Catch bugs and issues immediately when code is pushed
- Automated Testing: Run your test suite automatically on every commit
- Consistent Environment: Tests run in the same environment every time
- Team Collaboration: Everyone gets immediate feedback on their changes
- Quality Assurance: Maintain code quality standards through automated checks
Next Steps
With your basic CI setup working, you can enhance it further by:
- Adding deployment steps for successful builds
- Setting up notifications (Slack, email, etc.)
- Running different test suites (unit tests, integration tests, UI tests)
- Adding code coverage reports
- Implementing conditional builds based on branch names
For further information and more advanced configurations, checkout CircleCi’s documentation.
Conclusion
Continuous integration is a crucial practice for modern Android development. CircleCI 2.0 provides a robust, cloud-based solution that’s easy to set up and maintain. With the configuration outlined in this article, you’ll have automated builds and tests running for every code change, helping you catch issues early and maintain code quality.
Originally published on Medium on August 13, 2018.